IT/모바일
제공 : 한빛 네트워크
저자 : Anghel Leonard
역자 : 김인희
원문 : Introduction to JavaFX Script
[이전 기사 보기]
JavaFX 스크립트 소개(1)
JavaFX 스크립트 소개(2)
JavaFX 스크립트 소개(3)
JavaFX의 dur (duration) 연산자로 애니메이션 효과를 낼 수 있는데, 배열에 비동기적으로 시간 간격을 넣으면 된다. JavaFX는 특정 시간(milliseconds)만큼 기다린 후에 배열에 있는 요소를 가져오게 되는데, 배열 내에 모든 요소를 가져올 때까지 이러한 과정이 반복된다. 다음 4가지 보간법(interpolations)이 사용된다.
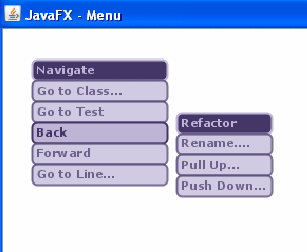
두 번째 프로그램은 스크린에서 드래그(drag) 가능한 팝업 메뉴의 시뮬레이션이다. 단순히 메뉴 헤더를 클릭만 하면, 불투명 효과 방식으로 메뉴 목록을 감추거나 보여줄 수 있다. 모든 디자인이JavaFX로 작성되었을 정도로, JavaFX는 드로잉(drawing)에 뛰어난 기능을 갖고 있다.
[예제 20]
[그림 9] 예제 20 실행 결과
JavaFX가 생성자 대신에 (SQL 처럼) 트리거(trigger)를 사용했음에 주목하자. 트리거는 trigger 키워드로 만들며, 헤더(header)와 바디(body)로 구성된다. 헤더는 바디에 있는 코드를 실행하기 전에 발생해야 하는 이벤트를 가리킨다. 트리거는 생성, 삽입, 삭제, 수정될 수 있다. 더 자세한 정보는 OpenJFK 사이트에서 triggers를 참조하기 바란다.
결론
JavaFX 스크립트는 Java 플랫폼에 새롭게 등장한 뛰어난 기능을 가진 언어이다. JavaFX는 자바 Swing이나 자바 2D보다 더 적은 시간을 들여 화려하고 동적인 인터페이스를 만들 수 있다. 이 기사에서는 JavaFX의 기본적인 구문, 지원 가능한 IDE 그리고 JavaFX의 가능성을 맘껏 보여주는 데모 프로그램들을 소개했다. JavaFX는 곧 자바 개발자들의 개발도구에 있어 필수적인 요소가 될 것이다.
참조
저자 : Anghel Leonard
역자 : 김인희
원문 : Introduction to JavaFX Script
[이전 기사 보기]
JavaFX 스크립트 소개(1)
JavaFX 스크립트 소개(2)
JavaFX 스크립트 소개(3)
JavaFX의 dur (duration) 연산자로 애니메이션 효과를 낼 수 있는데, 배열에 비동기적으로 시간 간격을 넣으면 된다. JavaFX는 특정 시간(milliseconds)만큼 기다린 후에 배열에 있는 요소를 가져오게 되는데, 배열 내에 모든 요소를 가져올 때까지 이러한 과정이 반복된다. 다음 4가지 보간법(interpolations)이 사용된다.
- linear
- easein
- easeout
- easeboth
두 번째 프로그램은 스크린에서 드래그(drag) 가능한 팝업 메뉴의 시뮬레이션이다. 단순히 메뉴 헤더를 클릭만 하면, 불투명 효과 방식으로 메뉴 목록을 감추거나 보여줄 수 있다. 모든 디자인이JavaFX로 작성되었을 정도로, JavaFX는 드로잉(drawing)에 뛰어난 기능을 갖고 있다.
[예제 20]
import javafx.ui.*;
import javafx.ui.canvas.*;
import javafx.ui.filter.*;
import java.lang.System;
class MenuOptions extends CompositeNode{
attribute px: Integer;
attribute py: Integer;
attribute lx: Integer;
attribute ly:Integer;
attribute lw:Integer;
attribute itemsOpacity:Number;
attribute menutext: String;
}
trigger on new MenuOptions {
    this.px = 0;
    this.py = 0;
    this.menutext = "";
    this.lx = 0;
    this.ly = 0;
    this.lw = 150;
    this.itemsOpacity = 0.0;
    }
function MenuOptions.composeNode() =
Group {
    transform: bind []
    opacity: bind itemsOpacity
    content:[Rect {
    x: bind lx
    y: bind ly
    width: lw
    height: 20
    arcHeight: 10
    arcWidth: 10
    fill: Color {red:190 green:181 blue:215}
    stroke: Color {red:68 green:54 blue:103}
    strokeWidth: 2
    onMouseEntered: operation(e:CanvasMouseEvent) {
    if(itemsOpacity == 0.7) {itemsOpacity = 1.0;}
    }
    onMouseExited: operation(e:CanvasMouseEvent) {
    if(itemsOpacity == 1.0) {itemsOpacity = 0.7;}
    }
    onMouseClicked: operation(e:CanvasMouseEvent) {
    eventListener(this.menutext);
    }
    },
    Text {
    x: bind lx+5
    y: bind ly+5
    content: bind menutext
    font: Font {face: VERDANA, style: [BOLD], size: 11}
    fill:Color {red:68 green:54 blue:103}
    }]
    };
class MainMenu extends CompositeNode{
attribute option: String;
attribute px: Integer;
attribute py: Integer;
attribute lx: Integer;
attribute ly:Integer;
attribute lw:Integer;
attribute menutext: String;
attribute step: Integer;
attribute submenu: MenuOptions+;
operation addSubmenu(t:MenuOptions);
operation show_hide();
}
trigger on new MainMenu {
    this.option = "";
    this.px = 0;
    this.py = 0;
    this.menutext = "";
    this.lx = 0;
    this.ly = 0;
    this.lw = 150;
    this.step = 20;
    this.submenu = null;
    }
operation MainMenu.addSubmenu(t:MenuOptions) {
t.lx = this.lx;
t.lw = this.lw;
t.ly = this.ly+step;
step=step+20;
insert t into submenu;
}
operation MainMenu.show_hide() {
if(submenu.itemsOpacity[1] == 0.7){submenu.itemsOpacity =
 [0.7,0.6,0.5,0.4,0.3,0.2,0.1,0.0] dur 1200;}
    else if(submenu.itemsOpacity[1] == 0.0){
    submenu.itemsOpacity =
     [0.1,0.2,0.3,0.4,0.5,0.6,0.7] dur 1200;}
}
function MainMenu.composeNode() =
Group {
    transform: bind []
    content:[Rect {
    x: bind lx
    y: bind ly
    height: 20
    width: bind lw
    arcHeight: 10
    arcWidth: 10
    fill: Color {red:68 green:54 blue:103}
    stroke: Color {red:190 green:181 blue:215}
    strokeWidth: 2
    onMouseDragged: operation(e:CanvasMouseEvent) {
    lx += e.localDragTranslation.x;
    ly += e.localDragTranslation.y;
    submenu.lx += e.localDragTranslation.x;
    submenu.ly += e.localDragTranslation.y;
    }
    onMouseClicked: operation(e:CanvasMouseEvent) {
    show_hide();
    }
    },
    Text {
    x: bind lx+5
    y: bind ly+5
    content: bind menutext
    font: Font {face: VERDANA, style: [BOLD], size: 11}
    fill:Color {red:190 green:181 blue:215}
    },
    bind submenu]
};
var menu_1 = new MainMenu();
menu_1.lx = 120;
menu_1.ly = 140;
menu_1.lw = 128;
menu_1.menutext = "Navigate";
var submenu_11 = new MenuOptions();
submenu_11.menutext = "Go to Class...";
var submenu_12 = new MenuOptions();
submenu_12.menutext = "Go to Test";
var submenu_13 = new MenuOptions();
submenu_13.menutext = "Back";
var submenu_14 = new MenuOptions();
submenu_14.menutext = "Forward";
var submenu_15 = new MenuOptions();
submenu_15.menutext = "Go to Line...";
menu_1.addSubmenu(submenu_11);
menu_1.addSubmenu(submenu_12);
menu_1.addSubmenu(submenu_13);
menu_1.addSubmenu(submenu_14);
menu_1.addSubmenu(submenu_15);
var menu_2 = new MainMenu();
menu_2.lx = 260;
menu_2.ly = 140;
menu_2.lw = 90;
menu_2.menutext = "Refactor";
var submenu_21 = new MenuOptions();
submenu_21.menutext = "Rename....";
var submenu_22 = new MenuOptions();
submenu_22.menutext = "Pull Up...";
var submenu_23 = new MenuOptions();
submenu_23.menutext = "Push Down...";
menu_2.addSubmenu(submenu_21);
menu_2.addSubmenu(submenu_22);
menu_2.addSubmenu(submenu_23);
operation eventListener(s:String) {
System.out.println("You choose:{s}");
}
Frame {
    centerOnScreen: true
    visible: true
    height: 500
    width: 500
    title: "JavaFX - Menu"
    onClose: operation() {System.exit(0);}
    content: ScrollPane {
    background: white
    view: Canvas {
    background: black
    cursor: DEFAULT
    content: [menu_1, menu_2]
    }
    }
}

[그림 9] 예제 20 실행 결과
JavaFX가 생성자 대신에 (SQL 처럼) 트리거(trigger)를 사용했음에 주목하자. 트리거는 trigger 키워드로 만들며, 헤더(header)와 바디(body)로 구성된다. 헤더는 바디에 있는 코드를 실행하기 전에 발생해야 하는 이벤트를 가리킨다. 트리거는 생성, 삽입, 삭제, 수정될 수 있다. 더 자세한 정보는 OpenJFK 사이트에서 triggers를 참조하기 바란다.
결론
JavaFX 스크립트는 Java 플랫폼에 새롭게 등장한 뛰어난 기능을 가진 언어이다. JavaFX는 자바 Swing이나 자바 2D보다 더 적은 시간을 들여 화려하고 동적인 인터페이스를 만들 수 있다. 이 기사에서는 JavaFX의 기본적인 구문, 지원 가능한 IDE 그리고 JavaFX의 가능성을 맘껏 보여주는 데모 프로그램들을 소개했다. JavaFX는 곧 자바 개발자들의 개발도구에 있어 필수적인 요소가 될 것이다.
참조
- Sample code: 본 기사의 샘플 코드 (예제 실행을 위해 새로운 NetBeans 프로젝트를 생성)
- The offical JavaFX site: 데모 파일, 명세서, 플러그인을 다운받을 수 있다.
- JavaFX classes documentation: JavaFX 클래스 리스트와 각 클래스에 대한 자세한 설명을 볼 수 있다.
- Plug-in for NetBeans: NetBeans용 JavaFX 플러그인
- Plug-in for Eclipse: Eclipse용 JavaFX 플러그인
TAG :
이전 글 : JavaFX 스크립트 소개(3)
다음 글 : Linux vs. BSD, 무엇이 다른가?
최신 콘텐츠
